Crawl Space Vapor Barrier Installation in Fort Collins & Northern Colorado
The soil beneath your crawl space releases moisture vapor continuously, regardless of the season. In Northern Colorado, where spring snowmelt saturates the ground for weeks at a time, summer landscaping irrigation keeps soil moisture elevated through the warm months, and temperature swings between seasons create persistent condensation conditions, that vapor emission is a year-round challenge that an inadequate or absent vapor barrier cannot address. Without a properly installed, continuous vapor barrier, that moisture rises freely into the crawl space environment, where it saturates insulation, feeds mold and wood-destroying fungal growth, elevates humidity throughout the home, and accelerates the deterioration of every wood structural member in the floor system above.
At Fort Collins Foundation Repair, we install heavy-duty crawl space vapor barriers designed to perform under the specific demands of Northern Colorado’s climate and soil conditions. Our vapor barrier installations are not simple sheet plastic laid loosely on the crawl space floor. They are carefully fitted, fully sealed, and properly secured systems that provide continuous, reliable moisture control across the entire crawl space footprint, including walls, piers, and every penetration through which moisture could otherwise bypass the barrier.
We serve homeowners throughout Fort Collins, Loveland, Greeley, Windsor, Wellington, Timnath, and surrounding communities of Larimer and Weld counties. Whether you are installing a vapor barrier for the first time, replacing a failed or inadequate existing barrier, or upgrading as part of a broader crawl space encapsulation project, we bring the same thorough approach and attention to detail to every installation.
Why a Proper Vapor Barrier Is Critical for Northern Colorado Crawl Spaces
Soil is never truly dry. Even in periods of low surface rainfall, moisture exists within the soil profile at depths that remain perpetually damp, and that moisture continuously evaporates upward through the soil surface. In a crawl space without a vapor barrier, that evaporation occurs directly into the enclosed air space beneath your floor, raising relative humidity to levels that support mold colonization, wood decay, and the deterioration of any insulation present. In a crawl space with a thin or damaged barrier, the protection is partial at best, and the moisture it fails to intercept accumulates in concentrated areas that often go unnoticed until significant damage has already occurred.
The clay-dominant soils throughout much of Larimer and Weld counties are particularly high moisture-retention soils. Clay holds water tenaciously and releases it slowly through evaporation, meaning that a significant rain event or snowmelt period can keep the soil beneath a crawl space releasing elevated levels of moisture vapor for weeks or even months after the surface conditions have dried. A vapor barrier rated for the moisture load that Northern Colorado soils produce must be thicker, more puncture-resistant, and more carefully installed than what might be adequate in a drier climate.
Beyond the crawl space itself, the consequences of uncontrolled vapor emission travel upward into the living space through the stack effect that operates in every home with a below-floor void. As warm air escapes from the upper levels of the home and pulls replacement air upward from below, that replacement air carries the elevated humidity and any airborne mold spores or soil gases present in the crawl space into the rooms above. Homeowners often experience the symptoms of a moisture-compromised crawl space as elevated indoor humidity, persistent musty odors, increased allergy or respiratory symptoms, or simply a home that never quite feels comfortable, without ever connecting those symptoms to the conditions beneath their floor.
A properly installed vapor barrier eliminates the soil as an active moisture source within the crawl space, fundamentally changing the moisture dynamics of the entire below-floor environment and the living space above it.
Signs Your Crawl Space Vapor Barrier Is Failing or Absent
- Musty or damp odors detectable in the living area, especially near floors and vents
- Visibly wet, torn, displaced, or missing sheeting on the crawl space floor
- Mold or dark staining visible on floor joists, subfloor sheathing, or insulation
- Insulation batts that are wet, sagging, or have fallen from between the joists
- Elevated indoor relative humidity levels that cannot be attributed to living area sources
- Condensation forming on cold water pipes, ductwork, or the underside of the floor above
- Efflorescence or moisture staining on crawl space foundation walls
- Wood surfaces in the crawl space that feel damp or soft to the touch when accessed
- Evidence of pest activity including rodent nesting in or beneath the existing barrier
- Thin original vapor barrier sheeting that is visibly degraded, brittle, or riddled with holes
- A crawl space that has never had a vapor barrier installed despite having an exposed soil floor
- Increased energy costs that suggest conditioned air is being lost through the floor assembly
If any of these conditions are present, a vapor barrier inspection and replacement evaluation is the appropriate next step. Many of these symptoms will not resolve on their own and will worsen progressively as long as the soil floor remains unprotected.
Get a Free Crawl Space Vapor Barrier Estimate
Fill out the secure form below to request your free crawl space vapor barrier evaluation. Our team will inspect your existing moisture control situation, assess the condition of your crawl space floor, walls, and structural members, and provide a clear recommendation for the vapor barrier system best suited to your home’s specific conditions. There is no cost and no obligation involved in requesting your evaluation.
Our Crawl Space Vapor Barrier Installation Process
A vapor barrier installation that performs reliably for the long term requires significantly more than laying plastic sheeting on a dirt floor. The preparation work, the material selection, the fitting and seaming approach, the wall attachment method, and the treatment of every penetration and obstruction in the crawl space all determine whether the installed barrier provides true continuous moisture control or simply creates the appearance of protection while leaving significant gaps through which vapor continues to enter the space.
Our installation process begins before any barrier material enters the crawl space. We assess the space thoroughly, address any conditions that would compromise the barrier’s performance or longevity, and prepare the floor and wall surfaces to accept the barrier correctly. This preparation phase is where less thorough installations commonly cut corners, skipping debris removal, grading corrections, and pre-existing moisture source management in the interest of getting material on the floor quickly.
The installation itself follows a careful sequence that ensures complete coverage without gaps, overlaps that are properly sealed rather than simply laid one over another, secure perimeter attachment that prevents the barrier from shifting or lifting over time, and treatment of every pipe, column, support post, and wall tie that penetrates the barrier surface. We use seam tape and sealant products rated for below-grade moisture exposure and compatible with the barrier material we are installing, because a seam that is not properly bonded is a gap in the moisture control system regardless of how well the field area of the barrier is laid.
When the installation is complete, we conduct a final inspection of the entire barrier surface, verify all seams and penetrations, and document the completed work so you have a record of the installation for future reference.
- Full crawl space inspection and moisture assessment: Evaluate existing vapor barrier condition, measure relative humidity levels, assess structural wood moisture content, identify all water entry points and drainage issues, and document the full scope of conditions present before any work begins.
- Drainage and standing water remediation: Address any standing water or active water intrusion pathways before barrier installation proceeds. Installing a vapor barrier over a chronically wet crawl space floor traps water beneath the barrier and accelerates deterioration of the soil subgrade and any organic material present.
- Old barrier removal and disposal: Remove all existing failed vapor barrier material, debris, deteriorated insulation that has fallen to the floor, and any contaminated material that would create a problem beneath the new installation. Proper removal is essential because new barrier laid over old failed material inherits the performance failures of what is beneath it.
- Crawl space floor grading and preparation: Grade the soil floor to eliminate low spots where water could pond beneath the barrier, remove sharp rocks or debris that could puncture the barrier from below, and create a smooth, stable surface that the barrier can lie flat against without bridging gaps or creating air pockets.
- Barrier material layout and fitting: Lay the heavy-duty polyethylene barrier panels across the full crawl space floor, fitting them carefully around piers, support posts, and obstructions. Orient panels to minimize the number of seams required and position seams away from areas of highest moisture exposure where possible.
- Seam overlapping and tape sealing: Overlap all panel seams by a minimum of twelve inches and seal the full length of every seam with purpose-rated seam tape, pressing firmly to ensure complete adhesion along the entire overlap. Seams are the most vulnerable points in any vapor barrier installation and are treated with the same care as the field area of the barrier.
- Penetration sealing at pipes, posts, and piers: Cut and fit the barrier tightly around every penetration through the floor area and seal each penetration with appropriate sealant and tape to eliminate gaps at these common bypass points. Penetrations that are not properly sealed can negate the performance of an otherwise well-installed barrier.
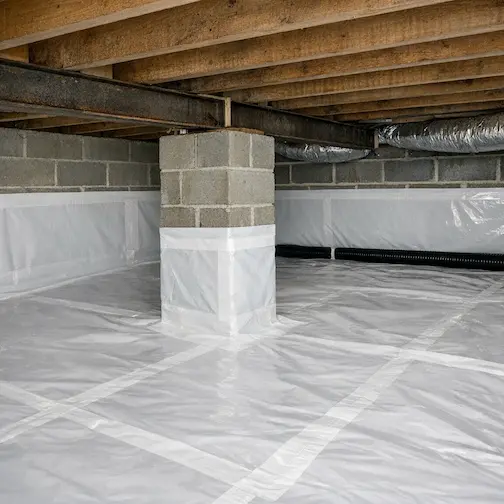
- Wall attachment and perimeter sealing: Run the barrier up the foundation walls a minimum of six inches, securing it to the wall surface with mechanical fasteners and sealing the top edge with appropriate sealant or tape. This wall attachment prevents moisture from entering at the floor-wall joint beneath the barrier edge and is a critical detail that is frequently omitted in less thorough installations.
- Final inspection, documentation, and homeowner walkthrough: Inspect the complete installation for any gaps, unsealed seams, or areas requiring correction. Document the completed work with photographs. Walk the homeowner through the installation, explain how it functions, and provide guidance on monitoring and maintaining the barrier going forward.
A thin sheet of plastic laid loosely on a crawl space floor is not a vapor barrier. It is a suggestion. A properly specified, carefully installed, and fully sealed vapor barrier system from Fort Collins Foundation Repair delivers the continuous moisture control that Northern Colorado crawl spaces require to stay dry, structurally sound, and free from the mold and air quality problems that uncontrolled soil vapor creates.
Schedule Your Free Vapor Barrier EvaluationCrawl Space Vapor Barrier Projects in Fort Collins & Northern Colorado
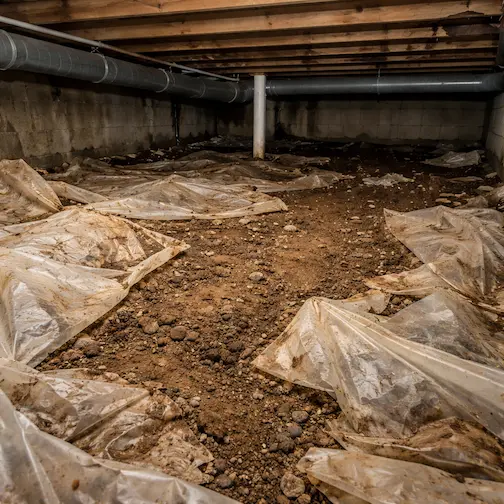
Before: Original thin vapor barrier completely deteriorated and displaced, with exposed saturated soil and visible mold on floor joists above.
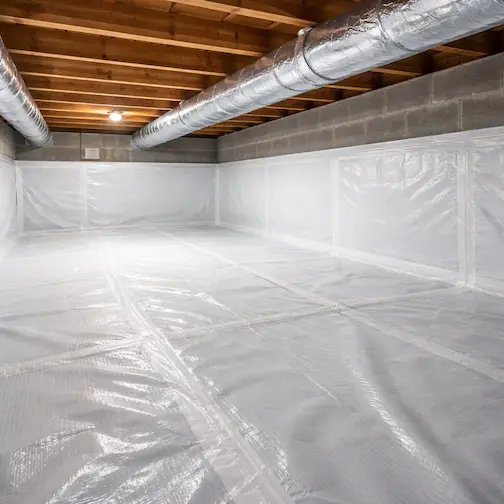
After: Heavy-duty reinforced vapor barrier fully installed, seams sealed, and barrier secured to foundation walls for complete continuous moisture control.
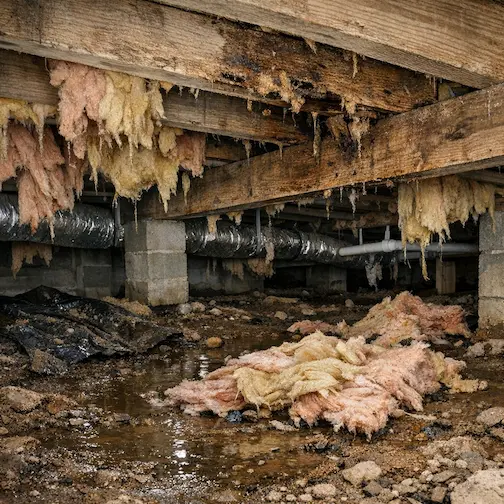
Before: No vapor barrier present, wet exposed soil, fallen insulation, and significant moisture damage to floor system framing.
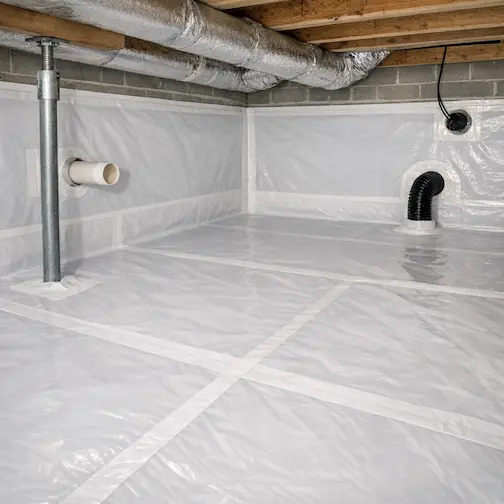
After: Complete vapor barrier installation with wall attachment, sealed penetrations, and full floor coverage delivering a clean, dry crawl space environment.
Vapor Barrier Components, Materials, and Options
Not all vapor barriers are the same, and the differences in material specification, thickness, reinforcement, and installation method have a direct and significant impact on how long the barrier performs and how effectively it controls moisture under the conditions present in your specific crawl space. Here is a detailed look at the components, materials, and options involved in a complete vapor barrier installation.
Barrier Thickness and Material Specification
Vapor barrier thickness is measured in mils, with one mil equal to one thousandth of an inch. The thin polyethylene sheeting commonly available at hardware stores typically measures six mils and is appropriate only for very low moisture exposure applications. For crawl spaces in Northern Colorado, where soil moisture levels can be elevated for extended periods and where foot traffic during future service work is unavoidable, we install reinforced vapor barriers in the ten to twenty mil range. Reinforced barriers incorporate woven or cross-laminated layers within the polyethylene that dramatically increase puncture resistance and tear strength compared to unreinforced sheeting of the same nominal thickness. This reinforcement is particularly valuable in crawl spaces with rough or rocky soil floors and in any space that will be accessed periodically for HVAC, plumbing, or other service work after the barrier is installed.
Seam Tape and Overlap Sealing
Every seam in a vapor barrier installation is a potential failure point, and the quality of the seam treatment determines whether the barrier functions as a continuous surface or as a collection of individual panels with gaps between them. We use seam tape specifically formulated for below-grade polyethylene vapor barrier applications, with adhesive chemistry designed to maintain its bond in the damp, temperature-variable conditions present in a crawl space over many years of service. Seams are overlapped by a minimum of twelve inches before taping to ensure that any area of tape bond failure along the seam edge does not immediately create an open gap through the barrier. The tape is applied with firm, consistent pressure along its full length to ensure complete adhesion without air pockets or lifting edges that would allow moisture to migrate beneath the tape and bypass the seam.
Wall Attachment and Perimeter Termination
Terminating the vapor barrier at the floor level rather than running it up the foundation walls is one of the most common and most consequential installation shortcuts we encounter. Moisture does not simply evaporate from the center of the soil floor. It also migrates laterally along the base of the foundation wall and through the floor-wall joint. A barrier that ends at the floor perimeter leaves this moisture pathway completely unaddressed. We run the barrier a minimum of six inches up the foundation wall surface, mechanically fasten it using masonry anchors or batten strips, and seal the top edge with a compatible sealant to prevent moisture from entering between the barrier and the wall face. This perimeter treatment completes the moisture control surface at the most vulnerable locations in the crawl space and is an essential component of an installation designed to perform rather than simply to appear complete.
Penetration Sealing at Posts, Piers, and Pipes
Every object that passes through or contacts the vapor barrier surface creates a potential bypass for moisture vapor. Support posts, piers, plumbing pipes, electrical conduits, and HVAC components that penetrate or sit on the crawl space floor must each be individually addressed during the installation. We cut the barrier to fit tightly around each penetration and seal the junction with compatible sealant and tape, creating a moisture-tight connection between the barrier and the penetrating element. In installations where posts or piers sit on footings that are below the surrounding soil grade, we wrap the barrier up and around the footing perimeter and seal it at the post base to prevent the footing from acting as a collection point for moisture beneath the barrier.
Vent Sealing as a Companion Measure
A vapor barrier installation that controls moisture rising from the soil floor can be significantly undermined by foundation vents that allow humid outdoor air to enter the crawl space freely during warm months. When warm, moist outdoor air contacts the cooler surfaces of an enclosed crawl space, it deposits moisture through condensation on every surface it touches, including the vapor barrier itself, the floor joists, the subfloor sheathing, and any insulation present. Sealing foundation vents as a companion measure to vapor barrier installation prevents this outdoor moisture contribution from negating the benefits of the soil moisture control the barrier provides. We discuss vent sealing as part of every vapor barrier installation evaluation and include it as a recommended companion measure in most Northern Colorado crawl space applications.
Dehumidifier Integration for Comprehensive Moisture Control
In crawl spaces with high ambient moisture levels or in encapsulated spaces where residual moisture sources remain active despite the vapor barrier installation, a dedicated crawl space dehumidifier provides an additional layer of active moisture management. The dehumidifier continuously monitors relative humidity within the sealed space and operates automatically to maintain levels below the threshold at which mold grows and wood structural members absorb damaging moisture. In the context of a vapor barrier installation, a dehumidifier is most valuable during the first season after installation while the crawl space environment stabilizes, and in spaces where foundation vent sealing alone is not sufficient to prevent outdoor humidity from contributing to elevated crawl space moisture levels during Northern Colorado’s warmer months.
Antimicrobial Barrier Options
For crawl spaces with a history of mold growth or in environments with persistently high organic content in the soil, vapor barrier materials with antimicrobial additives built into the polyethylene provide an additional measure of protection against mold colonization on the barrier surface itself. While a properly installed barrier and well-controlled humidity environment are the primary defenses against mold, antimicrobial barrier materials add a secondary layer of resistance that is particularly valuable in crawl spaces where organic debris has accumulated over many years and where mold pressure in the surrounding environment is high. We discuss this option as part of the material selection conversation during the assessment phase for any crawl space with a documented mold history.
Why Vapor Barrier Specifications Matter More in Northern Colorado
High-Retention Clay Soils Release Moisture for Months
The clay-dominant soils found throughout much of the Front Range retain water at much higher levels and for much longer periods than sandy or loam soils. Following a significant spring snowmelt or a series of summer rain events, the clay soil beneath a crawl space in the Fort Collins area may continue releasing elevated levels of moisture vapor for weeks or months after surface conditions have normalized. This extended period of high vapor emission places demands on a vapor barrier that a six-mil hardware store plastic sheet is simply not designed to meet. The barrier must maintain its integrity and its seal through this extended high-moisture period without degrading, lifting at seams, or allowing vapor to bypass at penetrations. Proper specification for the local soil conditions is therefore not a premium upgrade. It is a baseline requirement for reliable long-term performance.
Temperature Swings Stress Barrier Materials and Seams
Fort Collins and the surrounding Northern Colorado communities experience significant temperature variation between seasons and notable day-to-night temperature swings during shoulder seasons. These temperature changes cause polyethylene vapor barrier materials to expand and contract, placing cyclical stress on the material itself and on every seam, fastener, and sealed penetration in the installation. Low-quality polyethylene that lacks reinforcement can become brittle in cold conditions and crack or tear at stress points during temperature-driven contraction. Seam tape adhesive that is not rated for the temperature range experienced in a Northern Colorado crawl space can lose its bond over time, opening gaps at previously sealed seams. Specifying barrier material and seam products appropriate for the local temperature range is an important dimension of vapor barrier installation that is rarely discussed but consistently matters for long-term performance.
Irrigation Adds a Second Peak Moisture Season
Unlike climates where soil moisture peaks once in spring and then gradually diminishes through summer, the widespread use of landscape and lawn irrigation throughout the Fort Collins area creates a second period of elevated soil moisture during the summer months. Irrigation systems that run along the foundation perimeter, in planting beds adjacent to the home, or even in neighboring properties can keep the soil around and beneath the crawl space at elevated moisture levels from late spring through early fall, well past the snowmelt season. A vapor barrier installed in this environment must perform reliably through two distinct periods of peak soil moisture each year, separated by a relatively brief dry period in between. This dual-peak moisture environment reinforces the case for higher-specification barrier material and meticulous installation practice in Northern Colorado crawl space applications.
Give Your Crawl Space the Moisture Protection It Needs
The soil beneath your home is releasing moisture vapor every day, and without a properly specified and correctly installed vapor barrier, that moisture is finding its way into your floor system, your insulation, your structural framing, and ultimately your living space. Fort Collins Foundation Repair installs vapor barrier systems built for the specific demands of Northern Colorado’s soils, climate, and moisture conditions. Every installation is thorough, every seam is sealed, every penetration is addressed, and every project ends with a complete inspection and a clear walkthrough so you know exactly what has been done and what it will do for your home. The first step is a free, no-obligation evaluation. Fill out the form above and let our team assess your crawl space and give you an accurate picture of what it needs.
Contact Us for Your Free Vapor Barrier Evaluation